Early this week i have received a e-mail , asking financial help for a 2 year child who was about to undergo a bone marrow surgery.
I have created a spreadsheet using google docs and was updating the donations and calculating the total amount collected minute by minute. :) Very soon i got a feedback that many of our colleagues does not have internet access to view/track the donations :( . I was wondering how can i share the sheet with the users who does not have internet access but we are in connected in network.
Obviously its difficult to share the updated spreadsheet every minute to the requesting person since it involves manual time in gather email id and copying the sheet and mailing them every time i update the sheet.
Suddenly i recollected a light weight web server created few years back in python. I made it again in just minutes and shared the URL. My work got minimized the only thing i need is to update the html page and everyone see it from their browser.
URL is http://My-System-IP:8000, The below is the screenshot, I have blurred my system ip for security reasons

Building WEB SERVER in 2 Minutes
Step 1) I am assuming you already have python installed. If you dont have it please download and install it from http://www.python.org/getit/
Step 2) Python Code, Save the below code as webserver.py
import SimpleHTTPServer
import SocketServer
PORT=8000
Handler = SimpleHTTPServer.SimpleHTTPRequestHandler
httpd = SocketServer.TCPServer(("",PORT), Handler)
print "Serving at port ", PORT
httpd.serve_forever()
Step 3) Create a index.html or home.html page with the below code and save at the same location where you have saved webserver.py
<html>
<head><title>Hello </title></head>
<body>Hello World </body>
</html>
Step 4) Double click on the webserver.py program, a command prompt pops out saying
"Serving at Port 8000" as shown in the below screenshot

Step 5) open your browser and type http://your-system-ip:8000, Should look like below screenshot
 Log on the Command prompt which opened at step 4)

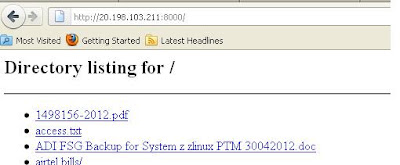
Note : If you have note created home/index.html file , python will list the contents of the drive as shown below.This way you can share your documents with colleagues or peers.
Python Rocks !!!! Creating this a web servers needs heavy application like Tomcat Apache, Of course if you want a light weight application the python is the superb solution
Please share your views/comments at Rakeshkumar.techie@gmail.com
I have created a spreadsheet using google docs and was updating the donations and calculating the total amount collected minute by minute. :) Very soon i got a feedback that many of our colleagues does not have internet access to view/track the donations :( . I was wondering how can i share the sheet with the users who does not have internet access but we are in connected in network.
Obviously its difficult to share the updated spreadsheet every minute to the requesting person since it involves manual time in gather email id and copying the sheet and mailing them every time i update the sheet.
Suddenly i recollected a light weight web server created few years back in python. I made it again in just minutes and shared the URL. My work got minimized the only thing i need is to update the html page and everyone see it from their browser.
URL is http://My-System-IP:8000, The below is the screenshot, I have blurred my system ip for security reasons

Building WEB SERVER in 2 Minutes
Step 1) I am assuming you already have python installed. If you dont have it please download and install it from http://www.python.org/getit/
Step 2) Python Code, Save the below code as webserver.py
import SimpleHTTPServer
import SocketServer
PORT=8000
Handler = SimpleHTTPServer.SimpleHTTPRequestHandler
httpd = SocketServer.TCPServer(("",PORT), Handler)
print "Serving at port ", PORT
httpd.serve_forever()
Step 3) Create a index.html or home.html page with the below code and save at the same location where you have saved webserver.py
<html>
<head><title>Hello </title></head>
<body>Hello World </body>
</html>
Step 4) Double click on the webserver.py program, a command prompt pops out saying
"Serving at Port 8000" as shown in the below screenshot

Step 5) open your browser and type http://your-system-ip:8000, Should look like below screenshot

Note : If you have note created home/index.html file , python will list the contents of the drive as shown below.This way you can share your documents with colleagues or peers.

Python Rocks !!!! Creating this a web servers needs heavy application like Tomcat Apache, Of course if you want a light weight application the python is the superb solution
Please share your views/comments at Rakeshkumar.techie@gmail.com